Apple Magsafe 1 to Magsafe 2 WITHOUT adaptor

I recently bought home a thunderbolt display so I could use it as a power adaptor to reimage an old Macbook Air.

The first hurdle was for some reason internet recovery – the option and R on boot method just booted saying startup disk not available so I had to get an image of Catalina so I could start the image process without relying on that option. Thanks to this tutorial https://www.tonymacx86.com/threads/gibmacos-tutorial-how-to-download-macos-directly-from-apple.295248/) I was able to make a bootable USB.

So I fired it up and realised I only had 21% battery life left

No big deal I thought, I’ll just plug the thunderbolt displays power on to it and we’ll be right to go…. WRONG….. the Thunderbolt display uses Magsafe 1 whereas the Macbook Air I was imaging uses Magsafe 2…

So as any normal person does I went to the almighty Google and searched for ways of resolving that issue and stumbled across this https://www.doktorsewage.com/modify-apples-magsafe-2-into-magsafe-1/#:~:text=MagSafe%201%20can%20be%20ground,a%20later%20MagSafe%202%20port

Instead of using a dremel I used pliers to break the outer shroud off the Magsafe 1 connector from the display and got out my trusty file.

I placed the small shroud in my vice and then slowly worked at grinding down the long sides of the Magsafe 1 shroud.

It surprisingly didn’t take all that long to do, I ground down one side and then turned and worked the other side and each time test fit the connector into the Macbook air. Once it did I then placed the shroud back around the magsafe pins and pressed back on carefully with pliers.

The result….

It actually works!

Hopefully this will help someone that may be in the same predicament.

Website comments are disabled but if you’d like to reach out feel free to contact me on Twitter

Using Gamepad as Midi Device (Foot Switch!)

Recently I began playing around again with FL Studio – it is great for beginners to audio and DAW’s in particular because they offer a free trial that essentially almost unlimited so you can really learn a lot about the product without having to buy it – I’ve bought a license though as I’ve used this software for over ten years and want to see it continue to be developed.

I’ve been using it to get the input from my Guitar via my M-Audio 2X2M device and then using VST’s such as Native Instruments Guitar Rig and one of the things I noticed very quickly was that not being able to control effects with a foot pedal was quite annoying.

Initially I started looking at commercial midi pedal boards but I didn’t really want to go an spend money on one and then realise that its not something that I actually wanted – luckily in my search I’d found some resources where people had made their own DIY foot switches.

So armed with internet knowledge, I went to the garage and found some switches and an old project box – the results of which you can see below

Now – the next issue I faced though is the gamepad by default is just detected as a USB game pad – we need software thats going to convert the button presses into a Midi Signal, and a signal processor that will send that data to our DAW (FL studio in my case)

The two pieces of software that you will want which work in Windows 11 are:

  • LoopMidi this creates the midi “port” for you to select in your DAW – just click the + button and add a device.
  • Rejoice: This software allows you to specify what type of midi signal you want your button presses to register, in my case I’m emulating guitar pedals so “Controller Change” worked fine – make sure you set “Midi Out” to be the loopMidi Port. I found Rejoice to be the better option for this as its very easy to see and understand your controller buttons because when you press and hold one you can then click on “Add” and define what the button should do.

Once you press a button, your should be able to see the log of data in loopMidi demonstrating that it is indeed receiving data – AND – one of the reasons I love Rejoice over other tools is it gives its own log of inputs as well

Now – back in FL Studio we’ll need to go to Options > Midi Settings and enable our loopMidi Port and also set a port number for it in the input section – it should look like the picture below

Lastly – we need to configure the VST we are using so it knows to listen to that port for Midi Inputs. So open your VST up – and then click the plugin config button

Then – set the Midi Input Port to be the same port as you set in your Midi Input settings earlier

We’re almost there at this stage – the next thing that we need to do though is make sure our buttons actually do something

To make sure they do, in Guitar Rig 5 right click on any of the amps power switches and then click “Learn”

Lastly – press one of your foot switch buttons.

All going well – you’ll get a message saying the controller button has been assigned

You can now use your foot switch!

If this post has helped you feel free to reach out to me on Twitter – because all comments on this site have been disabled due to constant spam.

Unraid 6.9.2 GPU Passthrough

Recently my friend and I were toying with this because I wanted to be able to play some games and only had Mac’s at my house.

After a lot of googling and trial and error he gave me access to Unraid and I went to work on trying to find out what was going on – hopefully this blog will help others trying to achieve the same result.

Thanks very much to https://www.reddit.com/user/Kemaro for the original write up on this.

Getting the GPU Dump User Script

First of all – before getting started you need to install the User Scripts Plugin in Unraid. Once the User Script plugin has been installed then you will also need the GPU Dump script from here https://github.com/SpaceinvaderOne/Dump_GPU_vBIOS Make sure you add this as a user script and follow the instructions for dumping your cards VBIOS.

Establish Windows 10 VM

Now – you’ll also need a Windows 10 VM as well. Create it initially with just the VNC driver as the primary GPU, don’t pass through the second GPU yet.

Once loaded up, make sure that you install the VIRTIO drivers. Update windows.

Enable a program like teamviewer or RDP so you can access the VM without using Unraid’s browser VNC

Unraid Configuration Changes

Next – in Unraid go to Tools and then System devices. Make sure you tick all the devices that are your graphics card in the IOMMU group – then press “BIND SELECTED TO VFIO AT BOOT” Ours was done like this – as you can see its not simply just the graphics card its also the audio controller on the card and USB controllers.

Before you reboot unraid, go and click on the Flash drive under Main and add the following at the end of the second line in the Unraid OS Section

video=efifb:off

It should look like this

Go ahead now and reboot Unraid.

Configuring the VM Part 2

This is the key missing component from most guides I’ve seen. The next thing we need to do is pass through our GPU. We need to select the rom file as well and then also pass through the other devices related to the GPU as well.

In our example we had the following devices to passthrough:


As well as


Don’t start the VM yet, simply update the config.

Updating the VM Part 3

The last step we need to take is edit the VM one more time, however this time we want to click the toggle that says “Form View” so we can see the XML view of the machine.

In the original guide I read it said to find the hardware code, in our XML that didn’t exist however we were able to find out where the GPU is referenced as the hostdev section as it mentioned the GPU VBIOS ROM file we specified. In this line we need to look for the line that references the bus that is uses

In our case this was the lines:

<hostdev mode='subsystem' type='pci' managed='yes'>
      <driver name='vfio'/>
      <source>
        <address domain='0x0000' bus='0x0a' slot='0x00' function='0x0'/>
      </source>
      <alias name='hostdev0'/>
      <rom file='/mnt/user/isos/vbios/gpu1660 vbios.rom'/>
      <address type='pci' domain='0x0000' bus='0x0a' slot='0x06' function='0x0'/>
    </hostdev>

The line that says bus =’0x0a’ is what we are after. We need to edit the other devices after this in our XML config to also be on the same bus. So go through and change the lines for the other hostdev entries after the Video card entry to match the bus entry to be the same (i.e all the other devices should also say bus = ‘0x0a’ as opposed to whatever the VM has preconfigured.

Once you’ve done this – save the config.

Cross your fingers and start the VM

All going well, this should allow the VM to boot without error. Now though – you’ll need to access it via RDP or Teamviewer, whatever you decided on earlier and you can install the video card drivers.

Errors you might come across

If you have an existing VM image you’ve been trying this on – first you should go back to basics and just use the VNC driver, to then use DDU (https://www.guru3d.com/files-details/display-driver-uninstaller-download.html to completely remove the GPU driver if you had tried to install it earlier. If you don’t you’ll likely boot to a black screen even if everything else has been done correctly.

If you see an error like the one below:

can't reserve [mem 0xd0000000-0xdfffffff 64bit pref] unraid

Then refer above to appending video=efifb:off to your boot config.

If you fully break everything like we did multiple times – remember as long as you have physical access to Unraid you can change things like the boot config by looking at the config folder on another computer and then hopefully be able to boot back up.

If this thread was helpful for you please consider donating

Bitcoin: 14322nah4Jv6SRheoBN1KS8jemuPVhHc88
Ethereum: 0x7c6e97e80d66bfe74a70d763a0a5617890dc6463
Or via osko in Australia send to donnie@up.me

Simple Mistakes Setting up Authelia

Recently I went down the path of setting up Authelia after a friend told me about using it and Traefik to effectively allow SSL to be applied to every docker container I have running at home should I want to.

If you want to learn about how to do this as well I highly recommend watching this video https://www.youtube.com/watch?v=u6H-Qwf4nZA the videos that Technotim produces are what I consider the appropriate level of tutorial, where he explains the reasoning behind doing something, the potential problems but also the reasons why he has decided to do something. On top of this, he also provides example documentation files which makes getting everything up and running a lot easier as you can start from a config he created.

Now – for me there were two very simple mistakes I made when trying to configure everything so I’d thought I’d outline them below and just how simple they are to fix.

Hashing your password

Part of the install process is issued the following command to hash your password:

docker run authelia/authelia:latest authelia hash-password “yourpasswordhere”

Seems simple right? Well it is. However the simple mistake that I made was I was issuing the command like this

docker run authelia/authelia:latest authelia hash-password ‘yourpasswordhere’

Using single back ticks tells Authelia you were using a special characters, in my case when I was testing I wasn’t so the hash created did not match, and therefore the password also did not then match since the hash was being changed due to single backticks

So thats simple problem number 1, very easy to fix that one. 

Setting up 2FA the QR Code Does not generate

In Technotim’s video he explains the method of using notification.txt instead of emailing a link to yourself. This allows you to be able to see the email that would be generated by logging into your authelia host and reading the notification.txt file. instead of having to go through all of the hassles of setting up outgoing mail servers.

Seems simple again right? Well it is… there was a simple mistake I was making here that caused this as well.

Many of you setting this stuff up are likely logging in via SSH or using some kind of console session to access everything. In my case I was using SSH to access the host, then opening nano to get the URL required for 2FA setup

The issue I found was nano doesn’t make it very obvious if you’re seeing the end of a line or not – so the URL for setting up 2FA was actually extending beyond the boundary of the terminal session I was using.

I originally thought there may be a mismatch between the URL being generated and what got stored in the database, which is where I found the issue because I could see when using DB Browser for SQL Lite that what I had in the browser bar did’t match what was stored in the DB. I copied the key from the DB into the browser and then everything worked as normal.

Confused as to what was happening I decided to instead use the command tail to read the file instead of opening it with nano. This is as simple as

tail notification.txt

This will just dump the contents straight to the terminal and you can copy and paste it from there, in full length as it will split it over the lines instead of letting the text go beyond the end of a window.


If this thread was helpful for you please consider donating

Bitcoin: 14322nah4Jv6SRheoBN1KS8jemuPVhHc88
Ethereum: 0x7c6e97e80d66bfe74a70d763a0a5617890dc6463
Or via osko in Australia send to donnie@up.me

Why are NFTs Important

If you follow the crypto world at all you would of heard of NFTs or non-fungible tokens. To put it really simple an NFT is a unit of data stored on a blockchain that certifies a digital asset is actually unique.

Now why is that a big deal? For people that create art it means that they can create (also called minting) an NFT for a piece of work that they have made that will show immediately an ongoing a proof of authenticity.

For people involved in collectibles the easiest way to think of it is that its similar to having a set of baseball cards or basketball cards that are in high demand – however in this case the onus would be on you as the seller to prove that the card is indeed real and not a fake (a problem common with Nike Shoes on ebay that the business StockX now solves with their verification service)

With an NFT on creation this unique print already exists and it is retained when the next user buys, trades or sells the same asset. For example if tomorrow someone famous such as Ozzy Osbourne was to mint a brand new song on OpeanSea a new unit of data showing that song would be created and can not be deleted or changed. Ozzy then lists that song for sale for 10ETH. A fan wants to buy that song and is prepared to pay the 10ETH for it and does so using Metamask. That fan is now the owner of that particular NFT. Now – in a years time they decide that they would like someone else to be able to purchase that NFT from them and they list it for sale, the next prospective buyers can see the transaction history all the way back to when the NFT was originally created (example shown below)


There is no need to have the NFT independently verified as it iss already available on the public blockchain ledger.

This gives artists the ability to set value for their own works and depending on the marketplace they list with they can also set it up so that upon each new sale they would still receive a royalty. There are some artists that are also using this as a method of creating rare content or additional content to a release for example it could be an NFT that has both the studio version of a song and the radio release.

Mike Shinoda from Linkin Park had a really good Twitter thread explaining exactly this concept that you can read here and also showing that the particular NFT he sold was able to provide more value back to him in a much shorter period of time than what would be possible if it was listed on digital streaming platforms (e.g. Spotify, Apple Music etc)

It is important to note that NFTs don’t always grant you exclusive rights to distribution of what you have bought which again means that the original artists can still maintain good control over what they have created.

If you are interested in purchasing NFTs then you should take a look at the sites OpeanSea, Rarible and Zora. Remember that if you are setting up a new wallet to transact on any of these sites you must save your secret words or whatever the wallet speifices, these are the only way for you to retrieve your wallet contents in the future, it is not like a normal email and pasword system.

Why should you get into Cryptocurrency?

At the moment with all of the lockdowns and economic uncertainty a lot of people are shifting their interests to cryptocurrencies again and quite often I’m asked why would people trust it as opposed to a standard financial system (e.g. banks)

In most developed nations we’ve been incredibly lucky to not have to be worried by financial system collapse but then COVID-19 has certainly changed that now for a large amount of people. However even before COVID the financial systems in other nations being decimated lead people to look for alternatives of where to store value and money.

Traditionally people would look to things like gold and silver, basically anything that wasn’t money or real estate to retain value over time. Cryptocurrencies have now provided an alternative store of value that in most cases is not tied to a centralised service like a bank. For people that had gone through financial crisis they will have experienced trying to receive money from a bank and simply being told no you can’t have it – a concept incredibly foreign to those that have never had to experience it.

Asides from being a store of value there are Cryptocurrencies that provide functionality beyond just being a store of value or being an alternative to money. For example Ethereum’s ability to standardise the creation of ERC-20 tokens has meant that organisations or teams wishing to create a new application can effectively raise funds via an ICO (initial coin offering) tied to the application they are creating – instead of having to go out to investors or listing a company this is now available as an alternative.

Currently there are countries seeking to regulate the cryptocurrency world as seen with the recent BitCoin crackdown in China. America as well has began efforts to regulate the industry. These regulations are occurring because countries are noticing that cryptocurrencies can be a big threat to the way their financial systems operate. In other countries though such as Australia we have already regulated to a degree meaning that Crypto is not actually destroyed people just plan for how they will use and store the currencies based on the current tax rules

Cryptocurrencies are sometimes given a bad wrap as there are sometimes bad people involved in them – however this is no different to everyday life where a credit card can be stolen and you should always be cautious with making any decisions around finance.

Hopefully in the future more vendors will be accepting of cryptocurrencies and make it a more trusted form of exchange for goods and services. Right now Amazon, Facebook and even Walmart have indicated that they intend on offering the ability to pay in some way via crypto to their users.

Cryptocurrencies largely return autonomy back to those that hold it, they become responsible for the storage and the exchange and are not beholden to someone external being able to control something that is rightfully theirs. This is important because as seen recently it is quite easy for an online payment processor or a bank to simply ban someones ability of being able to transact – something that is not possible via use of most cryptocurrency wallets.

Decentralisation (the distribution of reliance from a central source of authority) is important and this is what Cryptocurrency can offer many people – the ability to not be at risk of the decision of an entity or provider that controls your ability to receive money. For example Paypal and Visa/Mastercard have all threatened or in some cases removed peoples ability to transact in a variety of cases some of which are questionable as to why they should be allowed to do this (to see examples just google Mastercard bans)

Right now given the economic instability of many areas of the world this is why people are moving money into this area. It’s no longer really about turning a quick profit (although that is still possible as well) its about long term protection and resilience.

If you would like to learn more about cryptocurrencies a great resource is where it all really kicked off from – the bitcoin whitepaper


Bootcamp Windows 10 High Sierra AND Fusion Drive

I recently reformatted my iMac which involves also reinstalling the bootcamp partition and I had all sorts of issues but eventually had this work for me so thought I’d post it since it seems that there are no real set in stone methods for this to work and I hadn’t seen this one yet. 

My iMac is configured to have a Fusion drive, that is a 128GB SSD combined with a 4TB mechanical drive that appears in OSX as one volume. If you want to know how to create that style of drive google “Create Fusion Drive” (or look here https://www.lifewire.com/setting-up-fusion-drive-mac-2260165)

Anyway….

I was referring to the article here https://apple.stackexchange.com/questions/313007/high-sierra-and-bootcamp-with-windows-10-not-working  as it seemed to be the only one referencing the creation of a GPT partition rather than converting a whole drive to GPT

Below is what I ended up doing as it was not 100% following the above guide but worked 

In OSX High Sierra (Boot Camp Assistant)

I already had the Windows 10 installer created so I just resized the drive to the way I wanted for having both systems installed and then let the computer reboot itself.

In windows installer

When bootcamp assistant rebooted I just let the drive boot as normal – then:

When you get to the “Choose Language” screen press Shift + F10 together on your keyboard, this will spawn a command prompt window. The guide I posted above mentions having to remove the autoattend.xml to be able to access a command prompt which isn’t necessary. Shift+F10 has worked in installers since I believe Windows XP.

Once it is open type in “diskpart” and then press enter. This will put you into the disk partitioning tool built into the command line in windows. 

Next – type “list disk” this will show you all disks currently connected to the system. You need to select the one that your bootcamp partition should reside on. In my case it was disk 0 so the command was “select disk 0”

Now that I’d selected the disk I needed to confirm that the Bootcamp volume was indeed on this, to do this just type “list volume” and press enter – it will show all the volumes on the selected disk. You need to then use the bootcamp volume number to select the volume, in my case it was 0 so the command was “select volume 0”

The next part came from the other guide above – the initial step says to format the volume the command for that is:

format fs=ntfs label=BOOTCAMP quick

Once you press enter you’ll get a prompt saying that its formatting just wait until its done. Then it says to shrink the drive as well using this command:

shrink desired=600

After this it says to create another partition that has GPT, I attempted to do this and it failed and I thought it was due to drive size so I issued another shrink command (however I THINK that this command is actually not necessary now, the first one should be enough, if you try it let me know 😉 )

shrink desired=800

I attempted to do the next step again of creating a partition with GPT and it still failed…

Instead of issuing any more commands I just went back to the Windows Setup window and clicked the bootcamp drive then clicked on Next.

To my surprise the installation proceeded as normal, no complaints about GPT or MBR or EFI just a normal install 

Why Did this Work?

To be blatantly honest I’m not 100% sure but I’m guessing that its this:

BCA (bootcamp assistant) actually already has an EFI partition created and by default when creating the NTFS drive installs a hybrid MBR/GPT table at the same time. 

My guess is our first command formats whatever was left from BCA and then the second allows enough room for the Windows installer to add its own partitions to your bootcamp drive.

Normally if you click on a drive and press next you’ll get a warning saying that Windows needs to create additional partitions to be able to install. For me I did not get this warning so I can only assume that these were already created or the additional space from shrinking the partition allowed them to be created. 

Wont messing with the partitions stop OSX booting?

In this case it didn’t, as I was writing this windows was still installing and i thought I better check in case this is a waste of time.

It shouldn’t affect OSX because you don’t actually alter the EFI partition or the OSX partition that is already in place, you’re just formatting the bootcamp partition as NTFS and shrinking its size. 

What model mac did you do this on?

My iMac is running macOS High Sierra version 10.13.6 and the model identifier is iMac13,2

I used bootcamp assistant 6.1.0 as well.

For the windows ISO I used the latest available x64 Windows 10 image as of today 

Did it work for you?

Let me know in the comments below…

Pixel and Controller Basics + Xlights

I started with pixels about 2 years ago when I first saw Matt Johnson’s (www.livinglightshows.com / johnsonfamilylightshow.com) so I’m in now way an expert but I thought I’d write this to see if it helps others.

I’ve been watching the Official Xlights Forum on Facebook and seen many people have had the same questions I did. This post is an attempt to try and help all of you on your pixel journey. Below are a few of the terms explained in I hope an easy manner.

Universe

This term refers to the an addressable space – for most controllers it will be 510 channels or 512 channels. This numbering sequence comes from the DMX protocol which normally supports 512 channels in each universe

Channels

This seems to confuse so many people so I’ll try to make it simple.
Firstly you need to check what type of lights/pixels you have, if they are RGB, Single Colour or RGBW. Once you know this it is normally quite easy to determine the channel.

A channel represents an address per pixel – for RGB you’ll have 3, one for red, one for green and one for blue. For RGBW you’ll have 4 channels, for single colour you’ll generally have one channel (think of on/off for single colour)

When trying to determine the channels you need in a prop it is imporant to count the PIXEL chips and not the individual lights – unless each individual light has its own chip. This is quite common in strip lighting where one pixel will control multiple lights

Channel Mapping – Basics

This is another one that seems to confuse people and I think it is mainly to do with the fact that you set it in more than one place, for example if you sequence in Xlights and then move your show to FPP. You also need to make sure you map your channels correctly on your controller.

Channel mapping is basically just telling your software and your controllers how to “talk” to each pixel.  For my shows I’ve always used Unicast and issued each controller an IP address.

In Xlights then on the network setup tab you just need to specify the number of universes per controller and the universe size. Most controllers will have a universe size of 510 or 512.

If you are using RGB pixels and have your pixel count to get your total channels you should just times the pixels by 3.

For example if you have 1000 RGB pixels you’ll need 3000 channels to control these.

To figure out how many universes that is you get your channel count and divide it by your universe size:

e.g.

Universe has 510 Channels – 3000/510 = 5.882 Universes
Universe has 512 channels – 3000/512 = 5.8593 Universes

In the above example You then need to round UP to the nearest number to capture all channels. So in Xlights you would add 6 universes for the above example which will capture all 3000 channels (plus a few extra that are unused in the last universe)

Once you have your channel mapping sorted in Xlights you need to make sure that your controllers match this as well – one thing to be aware of though is your number 1 channel does not start again on each controller in Xlights – but on your controller the start channel will be 1.

For example in Xlights your first controller has 6 universes with 510 channels in unicast on IP address 192.168.1.15 – Xlights will show that this is channels 1 to 3060.

On your next controller you add xlights will start ad 3061 – however in your controller its start channel will be Universe 1 – Channel 1. You do not need to make the “number” column in Xlights match your controller using this method.

Connecting Pixels to a Controller

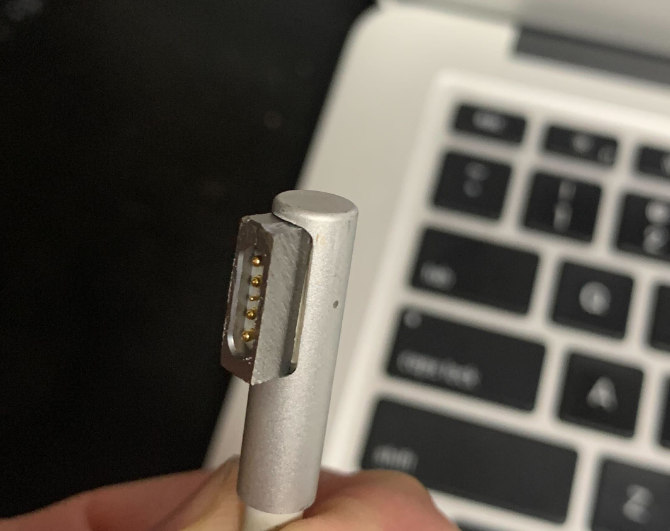
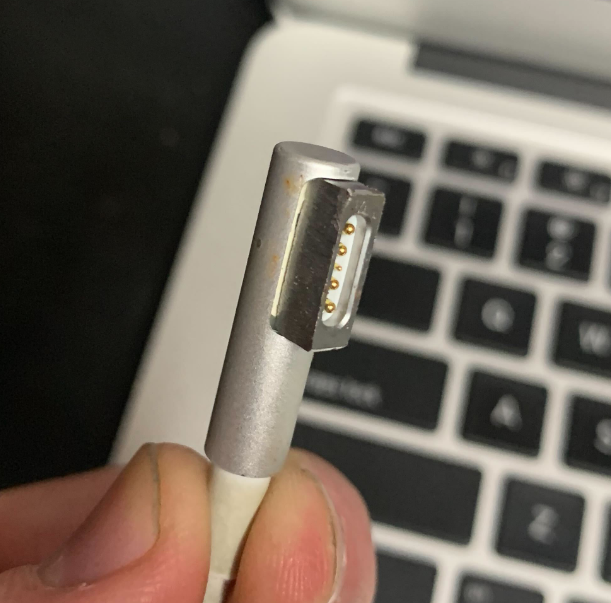
Nearly all pixels come with either colour coded wiring OR will have markings on the pixel itself that indicate 12V, DI, GND and on the other side 12V, DO, GND (this is assuming 12VDC pixels for simplicity sake)

Most pixels as well will have an arrow that indicates the direction of travel of signal through the pixels. The side with the arrow facing “in” to the pixel is the side you connect to the controller. If there is no arrow, its the side that has DI (stands for Data input) that your should connect to your controller.

If you get this wrong your pixels WILL not light! It is important to make sure that you also connect them to your controller correctly – if you mix up the wires you may blow a fuse OR blow a pixel chip (or a lot if its a string)

Networking

For your controllers always use private network addresses if you are addressing using unicast (more info on that here: https://www.iplocation.net/public-vs-private-ip-address)

IP addresses are a little like post office boxes, if two devices have the same IP address you get a conflict and no one knows where to actually deliver to.

There are two ways to set up controller IP addresses normally – DHCP or Static.

DHCP refers to a method whereby the controller asks a router or a connected device for an IP address. Although this method works the downside is that the IP address issued by DHCP can change. There is a way to stop this on most routers but the reality is by design DHCP is meant to just give out “an available address” and not the same address as last used.

Static refers to a method whereby the address is specified directly.

The main thing you need to worry about here is that you are using the same IP range and the same subnet – if you don’t your controllers cant be communicated with.

My personal preference is static. Last year I had three controllers with the following IP addresses:
IP: 192.168.0.51 Subnet: 255.255.255.0
IP: 192.168.0.52 Subnet: 255.255.255.0
IP: 192.168.0.53 Subnet: 255.255.255.0

Notice how the subnet is the same for every device and the IP address only the last number changes. Addressing in this way allows you to have up to 254 individual IP addresses that can all talk to each other.

You should connect your devices through a gigabit ethernet switch – and when testing from Xlights make sure that your Xlights computer has the same network addressing otherwise it can not see/get traffic to your controllers.

Null Pixels

The roll of a null pixel is to improve the data signal of from your controller to your first pixel. A lot of confusion seems to arise from this. If you specify a null pixel in your controller it expects that the null pixel or pixels will be inline before your actual pixel 1 on an output. A null pixel on most controllers still takes up channels as it needs to get initial data.

There are a few things you can do to avoid having to use null pixels
1) Put your controllers closer to your props
2) Use different controllers, different controllers seem to have different abilities to send data over greater lenghts
3) Use an appropriate type of wiring
4) Use receiver boards instead of null pixels (these are boards that are kind of like a slave from the first controller on to the next)
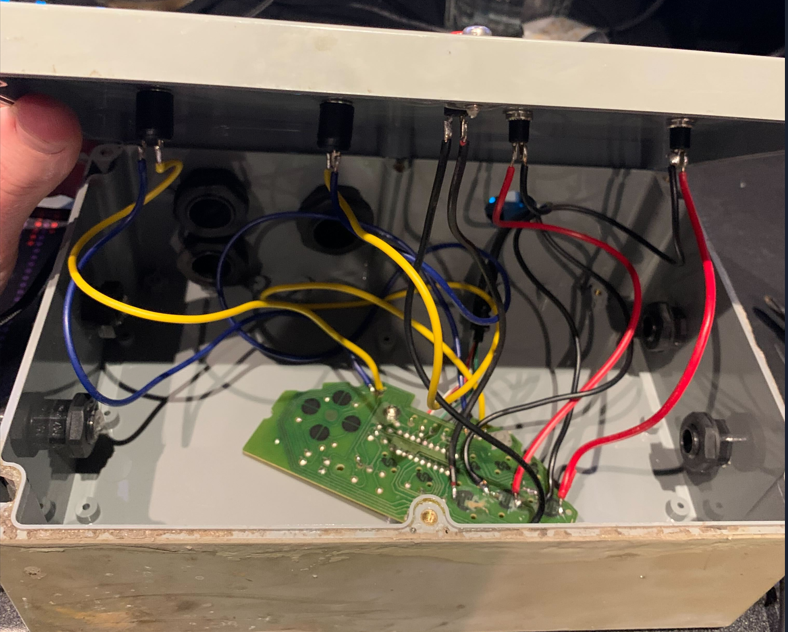
Power Injection

Power injection refers to the practice of powering a prop directly from a power supply rather than from a controller. There are benefits to doing this:

1) Most controllers can only supply 4-5A per output (60W if using 12VDC @ 5A) this means you only have a certain amount of wattage available before you are actually overdrawing current and likely to blow a fuse. Power injection allows you to use the maximum power available on a power supply. It is still STRONGLY recommended that you also fuse anything you directly inject with a fuse according to the current draw.

2) In some cases I’ve found that injecting power allowed me to send data a greater length

3) You can power multiple props over multiple controllers using a separate power supply (be sure to tie the negative between your supplies)

If you want to try power injection the simplest way is to not connect your positive from your controller to your prop – instead connect the positive from a power supply directly to the positive on your pixel – THEN – the next bit can be a little tricky, you need to make sure the ground wire of your prop connects to both the ground wire of the PSU and the ground wire of the controllers pixel output. This is because you need both ground and the data wire to send a signal, not just the data wire.

Power Calculation

This one always seemed to stump a lot of people as well. If you are trying to figure out what wattage a prop will draw you can do the below calcualtion

Volts x Amps = Watts e.g. a Meanwell 12VDC 30A PSU to calculate watts is 12 x 30 = 350W

If you know the wattage and what amps then:
Wattage Divided by Voltage. In the meanwell example above that then becomes 350/30 which equals 29.16666A <— they normally round this figure to 30A

Why is this important? If you are making a prop with a lot of lights you need to know how much power you need for the prop to light at full white at 100% – for example if you have a matrix with 1,152 12VDC WS2811 Pixels and you know that each light is 0.29W then we can do the calculation below:

Total Wattage draw – 0.29W x 1152 pixels = 334.08W
Total amp draw = 334.08W / Voltage (assume 12V) = 27.84A

The above two numbers make it easy for you to then decide what type of power supply you may need to run that particular prop.

Personally I find breaking down into sections rather than trying to push power over 1000 lights works a bit better.

Falcon Pi Player (FPP)

Falcon Pi Player is software that runs on a raspberry Pi. This software can take *.FSEQ files from Xlights and  run them on a schedule. The FPP software sends the data required out to your controllers to run your light show.

Now that Xlights has xSchedule some people are moving away from FPP and to xSchedule. For me – I like being able to use the low power raspberry Pi’s that I can leave on all the time to run the show – it frees up a computer for me to sequence on that won’t affect the running show.

A special note about FPP – the SD image you download is incredibly simple and easy, older style raspberry Pi images required you to flash in certain ways. The latest FPP builds just need to be dragged and dropped on to an SD card, then you just need to boot the Pi and watch until its fully loaded the first time.

Should I use AC timers to turn off my controllers/props?

This comes down to personal preference – however I normally do this so that during the day none of my controllers or props have power. This is because if there is no electricity flowing then issues such as short circuits can not occur. I saw some posts this year of guys that unfortunately lost some equipment whilst power was on to some gear during the day when they were not home.

You can use any AC style timer – however if you can afford it Belkin make a device called the Wemo Insight which will actually monitor your power draw and allow you to see the state of the device even if you are not home.

Should I worry about water/snow/etc

In reality you should worry about sealing your equipment so that water/snow etc should not cause issues before it rains/snows/etc. However unfortunately sometimes water can still creep in even if you take the steps below.

Precautions you should take to avoid water/dust etc getting into controller boxes or other things are:

1) If using a box for your controller make sure your glands are IP68 rated and when you seal them that they actually seal.

2) Use IP68 rated enclosures – be sure that any o-rings or silicone seals are in place correctly before sealing your boxes

3) Use watertight solder sleeves. If you can’t get these use heatshrink then wrap the heatshrink with corona tape, then put a small layer of insulation tape on to prevent the corona tape sticking to iteself.

4) Use drip loops. Drip loops are simple a loop in a cable so that if water tracks down a cable it falls off at the bottom of the loop and won’t track all the way back to a controller or power supply .

5) Periodically check your enclosures!

This year our show ran every night regardless of heat/snow etc. My controllers were all indoors however. Last year I had one controller outside and after I had everything operational I put a layer of silicone around the box to ensure that the box was water tight. In my area it doesn’t snow so I don’t have to deal with that.

This year I made sure any strip lighting we had cut had the ends siliconed.

I’m just starting out what should I do?

If you are just starting out the simplest thing you can do is buy a power supply, a lighting controller and some pixels. See if you can map them and get them running using Test mode in Xlights.

After you get them running in test mode, make a basic sequence in Xlights and then if you feel comfortable, order more lights and props 😀

Fixing Note 3 Teamwin Boot Loop Issue

Recently I was trying to completely wipe and Android device so I could pass it on to someone to work with a DJI drone so that they wouldn’t need to spend money buying a phone.

However after attempting to restore the phone to factory settings I ended up getting a boot loop issue where the phone would not load entirely.

I began searching and most of the information I found indicated that I’d need a windows computer and specialised software. It turns out though all you need is the Android SDK.

You can download the SDK for your appropriate system from here:

https://developer.android.com/studio/releases/platform-tools.html

Once you’ve downloaded them (in my case I’m on a mac) extract the files and enter the extracted folder then start adb by issuing the command “adb devices”

You should now be able to issue commands via adb. Here is what I did next:

STEP ONE – This command starts a shell session on your connected devices which means after this step you are running commands directly on your phone

beaugaudron$ adb shell

STEP TWO

~ # dd if=/dev/zero of=/dev/block/platform/msm_sdcc.1/by-name/fota

STEP THREE

~ # dd if=/dev/zero of=/dev/block/platform/msm_sdcc.1/by-name/misc

STEP FOUR 

reboot

If you are lucky like I was you should now be rebooted and past the looping screen.

Hope this helps – the advantage of this method over others is the only program and access you need is adb, you don’t even need fastboot nor do you need to be booted into recovery mode or download mode.


A great moment in marketing (Issue 1)

One of the random things I wanted to be able to cover off in this blog was a section “Great Moments in Marketing” where I could showcase some things that I thought were what I feel a great moment in marketing.

Recently my example of this is a company called “Step One Underwear” that created quite a clever and craft video that can be viewed below

The video is definitely crafty and fun and has amassed over 300k views on Facebook

This to me wasn’t the great moment in marketing though – the great moment was when a friend of mine posted on Snapchat that he had bought a pair, and the packaging that it came in.

The packaging which I unfortunately don’t have a picture of had this text on it:

“You’ve never been so close to comfort and had to give it away – but don’t worry you can get a pair to go to stepone.life and use the discount code POSTIE at checkout”

I consider this a great moment in marketing as the video has drawn people to the site, someone has ordered and then rather than end it there they’ve given another attempt at sale on the packaging itself – this to me is a good example of both the sales and marketing process, you need to be advertising and asking for the sale and have more than one strategy.

So thats it for the first instalment of great moments in marketing – I’m looking forward to seeing or hearing more!